
I recently found the website Pinterest, wow there are so many wonderful ideas for craft projects! The one that caught my eye was the paint chip art. I felt that was a project I could make my own as well as be an inexpensive one.
So I headed to my local home improvement store and picked up some paint chips, a can of heavy duty spray adhesive, some wood stain, and a 2'x2' cut of wood. I chose oak for my project because I wanted a border and the oak showed the wood grain beautifully. The oak was also thin and light to hang on the wall.
Next I headed to a department store and picked up some heavy duty spray adhesive, a bottle of Modge Podge, (I chose the matte finish), and some acrylic glitter paint. In total I spent about $20.00 to buy all of the supplies needed to make this project come together.
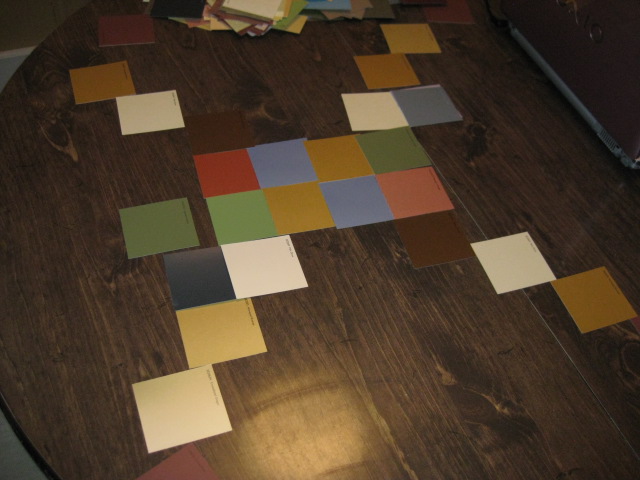 Deciding how you want your paint chips arranged is probably the most time consuming part of this project, but also the most fun. I knew I was going to have eight rows across and 8 rows down but was stumped as to what colors worked best in each row. So in order to find a starting point for my paint chip arrangement I made a design. I started in the middle and made an X pattern with my earthy brown colors going from lighter to darker and just worked from there playing with different color combinations.

Once I had my design I labeled the back of each paint chip just in case they got mixed up. I started from the bottom left hand corner labeling each with a paint chip #, row #, and whether it was bottom, middle, or top, then left or right and stacked them in order.
I had already measured and cut a piece of poster board to the dimensions I wanted my entire mosaic to be. I sprayed the poster board with my heavy duty adhesive and began to stick my paint chips on smoothing them down with a plastic scraper.
 I then covered the whole piece with my Modge Podge.
 I wanted a defined texture so I took my foam brush and alternated smoothing the Modge Podge on each paint chip horizontally then vertically to give it a checkerboard look. I put on 3 coats, mixing in a squirt of gold acrylic glitter paint with the last coat of Modge Podge. I then let that dry over night.
 I wanted the trim on my wood board to be pretty dark since much of my furniture is a dark cherry finish so I used Minwax red mahogany. It only took one coat for it to look just right. I let that dry overnight as well.
Once I was sure my Modge Podge was completely dry I put a coat of the stain over the entire piece and then wiped most of it off. I let that dry for several hours. I only needed to apply one coat of stain.
 Some of my paint chips did not completely adhere to the poster board and some Modge Podge settled underneath those spots and made it bumpy in a few places. At first I was a little bummed that the entire surface wasn't smooth but once I stained over the glittery Modge Podge it looked really cool, kind of look an old world mosaic piece.
 The last step was to stick my poster board to my stained piece of oak. I sprayed the back of my poster board with the adhesive and pressed it onto the oak board. The edges were not sticking well so I took a little gorilla glue and went around the entire edge of the mosaic to be sure the entire piece was secured to the board.
Viola! The final product came out better than I anticipated and I had a lot fun doing it. Anyone can do this!


No comments:
Post a Comment