Wednesday, March 28, 2012

Friday, February 24, 2012

Paint Chip Mosaic Project #2

Well, I have definitely found a craft I am good at; paint chip mosaics!
Choosing the colors and creating the design is so much fun! Each one turns out different and there are so many ways to play with color, design, texture, depth, and size. My latest mosaic turned out great, very different from the mosaic I posted earlier in the blog. The texture is my favorite part about this project. I mixed matte Modge Podge with shiny Modge Podge and it catches the light very nicely.


Tuesday, February 21, 2012

Hand Print Tree Project


My sister-in-laws birthday was coming up and I was thinking of different crafty things I could do and saw this great idea on Pinterest thanks to the Nap Time Decorator blog. It was a tree with handprints for branches. My sister in-law loves trees and anything that's about family so I had my crafty idea, I just needed to think about how to put it all together.

So my supplies included 3 pieces of large poster board, paint chips of various colors, a brown acrylic paint marker, a few tubes of acrylic paints in various colors, spray adhesive, a printed quote about family, and a picture frame. I had all of the supplies except the acrylic paint markers, they cost about $9.00 for a set of six markers, well worth it.

The Nap Time Decorator made her tree very simplistic. I wanted mine to have a little more depth to it. I did this by using paint chips to make the grass and ground cover and also used paint chips for the leaves. There really is no end to what you can create with paint chips!

I drew the tree on a separate piece of poster board, colored it in using a brown acrylic paint marker, then cut it out and played around with the positioning of it. I then painted my husband and my boys hands each a different color and had them put their print on a separate piece of poster board. It took two tries for each of my little guys since they were a little confused as to what I was doing. Then I did my own hand and cut the prints out. Once cut I played with positioning and fit to make sure the look was right for what I was going for and also to make sure the hand prints fit over the tree and into the frame without looking crowded.

Now that I had all my pieces it was time to paste them onto the poster board. I started with my green and brown paint chips for my grass and foreground. Next I pasted on the base of the tree and then added the hand prints. I then affixed my printed quote and then glued on the leaves. I found a frame that matched the coloring on the tree perfectly and ta da, project complete!


I really enjoyed this project. It was fun to get my whole family involved, even if they were not thrilled to have "icky" paint on their hands, and I enjoyed drawing and creating. I haven't done that in so long, there just isn't enough time!!

Anyone can do this and it makes great art for your home or as a gift. Have fun and post a picture if you try it for yourself.


Friday, February 17, 2012

Garlic  Chicken Soup with Acini Pepe Pasta, Broccoli,
& Carrots


Evenings in our house can be pretty crazy with trying to get two little boys fed, bathed, and ready to go to sleep so dinner needs to be easy and quick, but still needs to taste really good. 
There is at least one night a week when I am looking for a new way to use leftover chicken breast and soups are quick and easy, and you can use so many combinations to change it up from what was made the last time you had leftover chicken. This recipe took some trial and error to get it just right but it has now become a staple in our household this winter. It is fast, easy, and so, so yummy.


INGREDIENTS

3 Tablespoons Butter
½ Cup Frozen Onions (half of a small onion if you choose not to use frozen)
1 teaspoon Chopped Garlic
2 Tablespoons Flour
4 Cups Chicken Broth or 1 - 32 oz Box of Chicken Broth
½ cup Acini Pepe Pasta
1 Can Cream of Celery Soup
1  - 19 oz Bag Green Giant Frozen Broccoli and Carrots with Garlic and Herbs
1 Cup Cooked Chicken or Turkey Cubed
½ Cup of Water
½  teaspoon of Pepper
¾  teaspoon of Poultry Seasoning
1  teaspoon Soy Sauce
6 – 10 Drops Hot Pepper Sauce

DIRECTIONS

In 8qt dutch oven melt 3 TBS of butter over medium high heat.
Add onion and cook for one minute.
Add garlic then cook until onion is soft and slightly browned.
Slowly whisk in flour then add chicken broth.
Turn heat up to high for 2 minutes or until mixture becomes creamy. 
Turn heat down to medium and add pasta.
Cook one minute more then add cream of celery soup, frozen vegetables, chicken, water, pepper, and poultry seasoning.
Cook 5 - 7 minutes or until vegetables are cooked through.
Add soy sauce and hot pepper sauce and simmer for 5 minutes.

ENJOY!

Approximate cooking time is 20 minutes
Serves 4 – 6 People

Saturday, February 4, 2012

Ground Turkey Sheperd's Pie


Ground Turkey Sheperd's Pie  
(Adapted from Rachel Ray)


INGREDIENTS

Betty Crocker Creamy Butter Instant Potatoes

2 Pillsbury frozen pie crusts

FILLING

2 tablespoons extra-virgin olive oil (EVOO)
2- 4 slices bacon, chopped or snipped with kitchen scissors
1 pound ground turkey or ground turkey breast
Ground pepper to taste
Salt to taste
½ bag frozen chopped onion
One bag frozen mixed vegetables (I preferred carrots, peas, green beans, and corn)
One  tablespoon Worcestershire sauce
One tablespoon A1 steak sauce
2 teaspoons poultry seasoning

GRAVY

2 tablespoons butter
2 tablespoons flour
One cup chicken broth
Salt to taste
Pepper to taste
½ teaspoon of poultry seasoning
1 teaspoon paprika
½ teaspoon garlic

DIRECTIONS

Preheat oven to 400 degrees.

Cook potatoes as directed on the box, cover and set aside when cooked.

Heat olive oil in a large skillet over medium high heat. Add bacon, cook 3 – 5 minutes or until crispy. Add the ground turkey to the pan and cook until browned, breaking up bacon to mix in as the turkey cooks. Season with salt and pepper and cook one minute more. Push turkey bacon mixture to the sides of the pan, add onions to the middle of the skillet, season with salt and pepper and cook for approximately 3 - 5 minutes stirring periodically. Mix onions in with turkey bacon mixture and push entire mixture to the sides of the skillet again. Add entire bag of frozen mixed vegetables to the middle of the pan, add salt and pepper to taste, then cook for 3 - 5 minutes stirring vegetables every couple of minutes. When vegetables are cooked mix all ingredients together and add Worcestershire sauce, A1, and poultry seasoning, cook for 1 – 2 minutes then turn heat to low and let mixture simmer.

In a small sauce pan over medium heat, cook butter until melted. Slowly add flour and whisk together until thick and creamy. Add chicken broth and continue stirring until mixture thickens. Add salt, pepper, poultry seasoning, paprika, and garlic and stir until blended. Add gravy to turkey mixture and mix together.

Pour mixture into pie crusts. Spoon potatoes onto turkey mixture and spread to cover. Put pies into the oven for 20 minutes then enjoy! 

Friday, February 3, 2012

Paint Chip Mosaic Project


I recently found the website Pinterest, wow there are so many wonderful ideas for craft projects! The one that caught my eye was the paint chip art. I felt that was a project I could make my own as well as be an inexpensive one. 


So I headed to my local home improvement store and picked up some paint chips, a can of heavy duty spray adhesive, some wood stain, and a 2'x2' cut of wood. I chose oak for my project because I wanted a border and the oak showed the wood grain beautifully. The oak was also thin and light to hang on the wall.   


Next I headed to a department store and picked up some heavy duty spray adhesive, a bottle of Modge Podge, (I chose the matte finish), and some acrylic glitter paint. In total I spent about $20.00 to buy all of the supplies needed to make this project come together. 


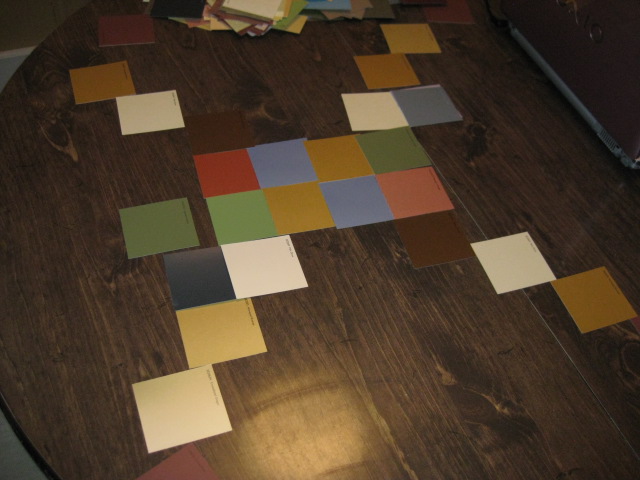
Deciding how you want your paint chips arranged is probably the most time consuming part of this project, but also the most fun. I knew I was going to have eight rows across and 8 rows down but was stumped as to what colors worked best in each row. So in order to find a starting point for my paint chip arrangement I made a design. I started in the middle and made an X pattern with my earthy brown colors going from lighter to darker and just worked from there playing with different color combinations.


Once I had my design I labeled the back of each paint chip just in case they got mixed up. I started from the bottom left hand corner labeling each with a paint chip #, row #, and whether it was bottom, middle, or top, then left or right and stacked them in order. 


I had already measured and cut a piece of poster board to the dimensions I wanted my entire mosaic to be. I sprayed the poster board with my heavy duty adhesive and began to stick my paint chips on smoothing them down with a plastic scraper. 


I then covered the whole piece with my Modge Podge. 

I wanted a defined texture so I took my foam brush and alternated smoothing the Modge Podge on each paint chip horizontally then vertically to give it a checkerboard look. I put on 3 coats, mixing in a squirt of gold acrylic glitter paint with the last coat of Modge Podge. I then let that dry over night.


I wanted the trim on my wood board to be pretty dark since much of my furniture is a dark cherry finish so I used Minwax red mahogany. It only took one coat for it to look just right. I let that dry overnight as well.


Once I was sure my Modge Podge was completely dry I put a coat of the stain over the entire piece and then wiped most of it off. I let that dry for several hours. I only needed to apply one coat of stain.

Some of my paint chips did not completely adhere to the poster board and some Modge Podge settled underneath those spots and made it bumpy in a few places. At first I was a little bummed that the entire surface wasn't smooth but once I stained over the glittery Modge Podge it looked really cool, kind of look an old world mosaic piece. 


The last step was to stick my poster board to my stained piece of oak. I sprayed the back of my poster board with the adhesive and pressed it onto the oak board. The edges were not sticking well so I took a little gorilla glue and went around the entire edge of the mosaic to be sure the entire piece was secured to the board.


Viola! The final product came out better than I anticipated and I had a lot fun doing it. Anyone can do this!